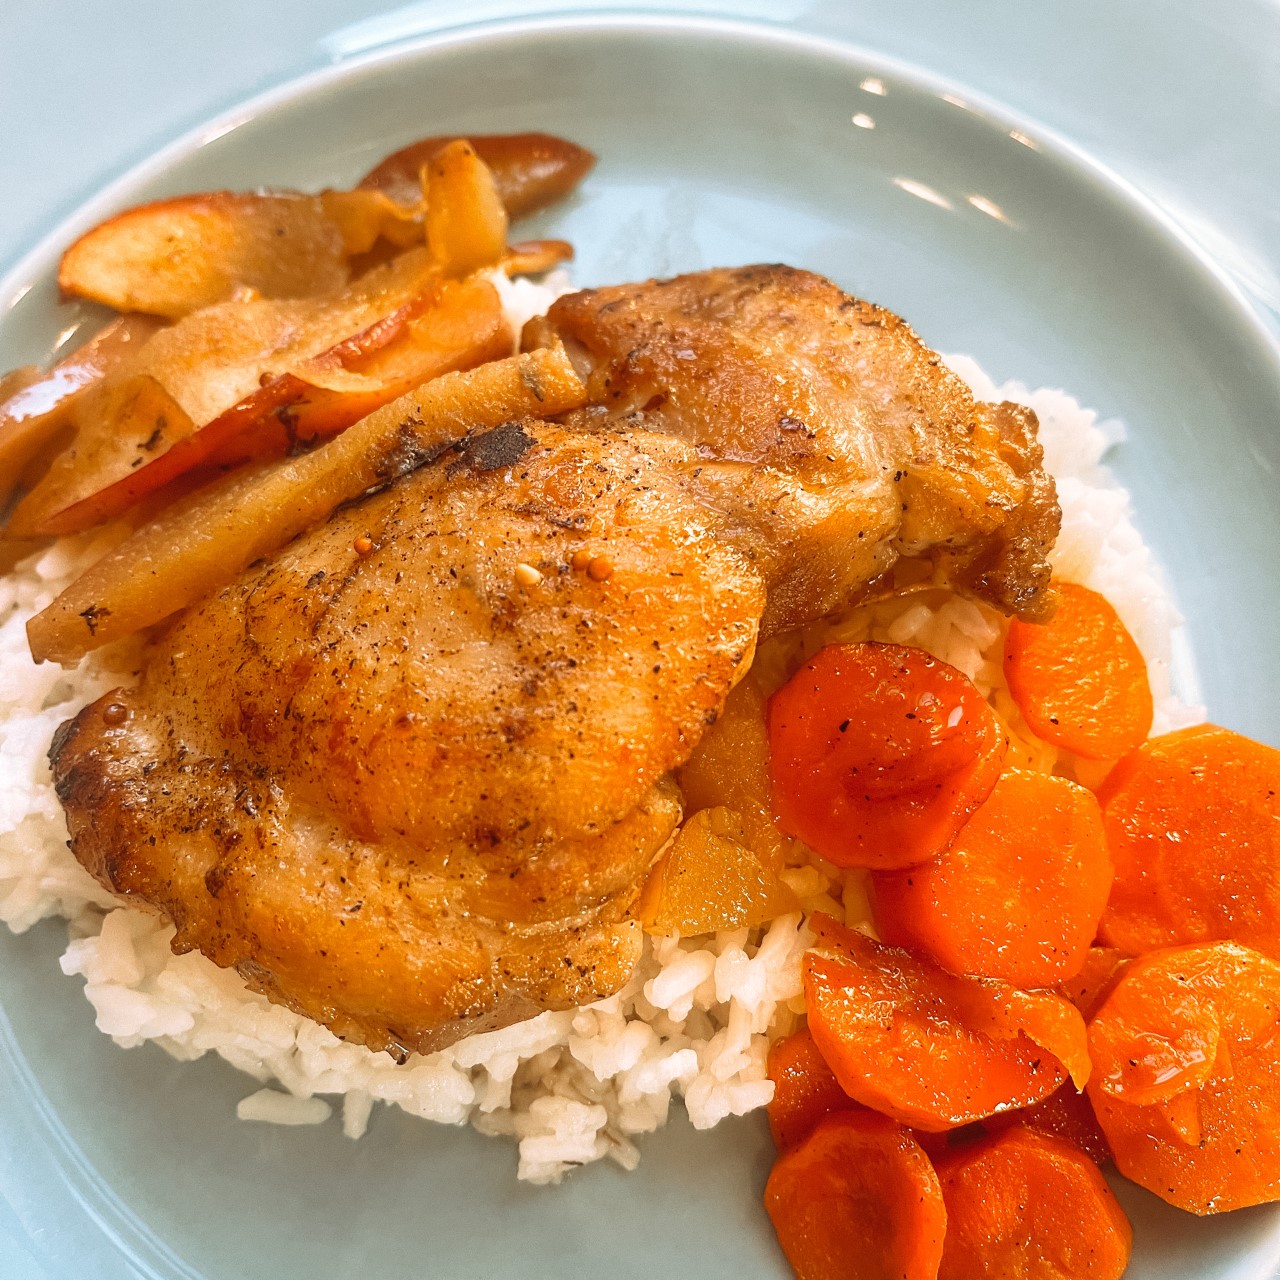
Apple Chicken with Cider Mustard Sauce Recipe

This apple chicken with cider mustard sauce recipe paired with the roasted carrot recipe makes for a delicious dinner! Just follow the steps below.. so yummy!

Apple Chicken with Cider Mustard Sauce

This recipe is the perfect combo of sweet and savory.

What you’ll need:

What to do:

  • Preheat the oven to 375°F.
  • Heat olive oil over medium-high heat in a skillet.
  • Pat chicken dry and season with salt and pepper. Cook skin down in a skillet for 8-10 minutes or until golden brown. Flip and cook skin side up for 1 minute. Remove chicken and place in a baking dish.
  • In the skillet, add thinly sliced apples and saute in the rendered fat until slightly caramelized (2-3 minutes). Add the White House Foods® Apple Cider Vinegar to deglaze the skillet and stir. Add the mustard, White House Foods® Apple Juice, and chicken broth. Stir to mix evenly. Transfer into the baking dish with the chicken.
  • Put in the oven for 20-25 minutes or until chicken is cooked through.
  • Plate chicken and top with apple slices and sauce.


Pair it with this Maple Cider Vinegar Roasted Carrots recipe:

Maple-Cider Vinegar Roasted Carrots

What you’ll need:

What to do:

  • Preheat the oven to 375°F.
  • In a skillet, melt butter in the olive oil over medium heat.
  • Add carrots, salt, and pepper. Cook until browned all over. Turn occasionally 3-4 minutes.
  • Remove the skillet from heat and add the White House Foods® Apple Cider Vinegar and pure maple syrup and stir.
  • Transfer to oven safe fish and roast for 6-8 minutes or until crisp in the center.


Post Sponsored By: 

For a dessert recipe, click here!


Thanks for reading! Let me know if you try it!


xoxo,


Brittany

Apple Butter Cheesecake Bars

Apple Butter Cheesecake Bar Recipe

White House Foods® Apple Butter + Cheesecake Bar = A heavenly combination

This recipe is perfect for Fall. Thanksgiving? Halloween Party? Sunday Dessert? Office Party? This is a sure hit recipe!

If you are an apple butter fan, you’re going to need this recipe. As always, it’s simple… (a must for me) and it’s also delicious (also a must)!

The recipe is below, but be sure to refrigerate overnight before serving. This is crucial for texture and flavor. Also, I highly recommend White House Foods® Apple Butter. It is made in Winchester, Virginia with American grown apples. You can find it at your local Wal-Mart, Food Lion, or online here! 

What you’ll need:

For the crust:
  • 1 cup unsalted butter
  • 2 cups all-purpose flour
  • 1/2 teaspoon salt
For the cheesecake layer:
  • 1 (8 oz.) package cream cheese
  • 1/2 cup sugar
  • 1 egg at room temp
  • 1 teaspoon vanilla 
For topping:
How to make it:
  • Preheat oven to 350°
  • First the crust: Cut butter into small pieces. Beat together the butter and flour until it is thoroughly combined into crumbly pieces. Place the crust mixture into an ungreased 13×9 baking dish. Pat the crust evenly into the dish with your hands. Bake the crust for 15 minutes. Remove and cool. I placed mine into the fridge to speed up this process.
  • Next the cheesecake mixture: Beat together the cream cheese and sugar until smooth then add in the egg and vanilla. Beat on medium until evenly combined. Set this mixture to the side.
  • Then the topping: Cut butter into small pieces. In a bowl, use a fork to mix the flour, confectioners’ sugar, butter pieces, pecans, and salt. This mixture will not be smooth. You should have a crumbly/coarse texture. Set to the side.
  • Make the magic happen: Take the cooled crusted and spread the cream cheese mixture on top evenly. Leave an edge around the outside perimeter to from “crust.” Next, spread a thin layer for White House Foods® Apple Butter over the cream cheese layer. Last, sprinkle the crumb topping over the top evenly.
  • Bake for 40 minutes. Remove and cool. Cover and store in refrigerator overnight before cutting into square bars.

Let me know if you try them! I can’t wait to hear your thoughts!

xoxo,

Brittany


Check out my easy print and decorate Fall Decor idea here: DIY Fall Decor – Free Printable


Post Sponsored By: 

White House Foods, serving families since 1908. Visit them online at www.whitehousefoods.com to find your favorite applesauce, juice, cider, butter, organic apple cider vinegar with mother, and much more! Proudly growing their own apples, here in the USA!

Dog Birthday Cake Recipe!

Do you celebrate your dog’s birthdays? If you don’t. this recipe may give you a reason to start!

This recipe is simple, yet your dogs will  L O V E  it!

Not into making it a cake? You could easily use the same recipe but shape into dog treats!

Here’s what you need:

  • 1 cup flour
  • 1/2 tsp baking soda
  • 1/8 cup vegetable oil
  • 1/2 cup peanut butter (half for cake, half for icing)
  • 1/2 cup White House Foods® Applesauce (we used chunky but you could also use Original)
  • 1/2 cup canned pumpkin puree
  • 1 egg
  • 1/2 cup plain Greek yogurt (be sure this is plain)
  • dog treats for decoration (optional)

Here’s how you do it:


For the cake- Preheat your oven to 350 degree F. Prepare an 8 inch round pan with by greasing with oil. In a bowl, mix flour and baking soda then set aside. In another bowl, mix vegetable oil, 1/2 cup of the peanut butter, White House Foods® Applesauce, and the canned pumpkin puree. Mix the wet ingredients then add egg and stir. Once all the wet ingredients are combined, slowly add in the dry ingredients. Stir until mixture is evenly distributed. Bake for 25 minutes or until golden brown. Test the center with a toothpick or knife. Let the cake cool before removing from the pan. While the cake is cooling, mix together the other half (1/4 cup) of peanut butter and plain Greek yogurt. Once the cake is cool, top the cake with icing and dog treats. Serve to happy dogs!

For other recipes (for people too), click here!


Easy Recipes: Chocolate Applesauce Cake

Easy Recipes: Chocolate Applesauce Cake

I am the QUEEN of Easy Recipes, and this one is 100% one of my favorites!

You may be thinking, Chocolate, applesauce, and cake is a questionable trio….. BUT trust me the trio was meant to be!close pic

I was skeptical but after tasting, this is going

to be my holiday dessert go-to. First of all, it was super simple. You do not need to be a fancy baker to pull this off. Second, I typically have all of the ingredients in my pantry… perfect for those last minute holiday parties or guests. 

I took this cake into the office break-room and it was gone within minutes. IT’s a must try…and then try again!

What you’ll need:

  • 2 cups all-purpose flour
  • 1 1/2 cups sugar
  • 1/4 teaspoon cinnamon
  • 3 tablespoons cocoa
  • 1 1/2 teaspoons baking soda
  • 1/2 teaspoon salt
  • 1/2 cup butter or margarine (melted)
  • 2 eggs
  • 2 cups White House Foods® Original Applesauce
  • 2/3 cup chocolate chips
  • powdered sugar

Directions:

  • Preheat oven to 350 degrees.
  • Grease a 9×13 pan.
  • Combine all the listed ingredients EXCEPT– 2 tablespoons of sugar and the chocolate chips—in a large mixing bowl. Stir until everything is evenly combined.
  • Pour the batter into greased pan.
  • Sprinkle the 2 tablespoons of sugar over top of batter in pan. Then sprinkle the chocolate chips on top of batter and sugar.
  • Bake in preheated oven for 40-45 minutes.
  • Let cool of 10 minutes then sprinkle powdered sugar over top of cake.
  • Serve warm & enjoy!


Try it for your next Sunday dessert or upcoming holiday festivities and let me know what you thought! Comment below or tag me on social @coldcoffeegrind 

piece with jar


For other easy, recipes, click here!

As always, thanks for reading and happy baking!


xoxo,


Brittany

The Perfect “Cozy Night” Beef Stew Recipe!

Is there anything better than coming home on a chilly day and cuddling up with a family movie night with some warm soup?

I love trying out new soups. To be honest, I usually go for a chicken noodle or gnocchi soup with a creamy base, BUT this Apple Cider Beef Stew is a NEW favorite for sure!

This soup is the perfect mix of hearty and sweet with a little tang. It’s a MUST try!

Check out the recipe below. To customize the recipe to your flavor preference, add more White House Foods Apple Cider for sweetness, Beef broth for heartiness, or White House Foods Apple Cider Vinegar for more of a tangy taste!


Homemade Beef Stew with White House Foods Apple Cider

Prep Time: 30 minutes

Cook Time: about 2 hours

8 servings

What you’ll need:

  • 5 pounds beef stew meat cut into cubes
  • 2 tablespoons of canola oil (or oil of choice)
  • 4 cups of White House Foods Apple Cider (or juice)
  • 2 cans reduced-sodium beef broth (14.5 oz)
  • 2 tablespoons of White House Foods Apple Cider Vinegar
  • 1-2 tablespoons of salt
  • 1/2 teaspoon of dried thyme
  • 1/4 teaspoon of pepper
  • 3 medium potatoes, peeled and cubed
  • 4 medium carrots sliced
  • 3 celery stalks sliced
  • 2 medium onions, chopped
  • 1/4 cup of flour
  • 1/4 cup water

Make it:

  • Brown beef on all sides in the oil over medium-high heat. Once meat is browned, drain.
  • Add beef to the White House Foods Apple Cider, broth, White House Foods Apple Cider Vinegar, salt, thyme, and pepper. Bring to a boil. Once boiling, reduce heat and let simmer for 1 hour.
  • Add the potatoes, carrots, celery, and onions. Bring soup to a boil. Once boiling, reduce heat and let simmer for 45 minutes (or until beef and vegetables are tender.
  • If you would like a soup with more broth, add additional White House Foods Apple Cider and beef broth in proportions to your taste. Extra White House Foods Apple Cider Vinegar may also be added.
  • Once the broth consistency is to your liking, combine flour and water in a mixing bowl. Stir to a smooth consistency. Slowly stir the flour mixture into the soup. Bring soup to a boil. Stir soup for 2 minutes or until thickened.
  • Serve & enjoy!


As always, thanks for reading. I hope you and your family LOVE this stew. Please tag me if you try and let me know what you thought!


Happy Fall!


xoxo,


Brittany


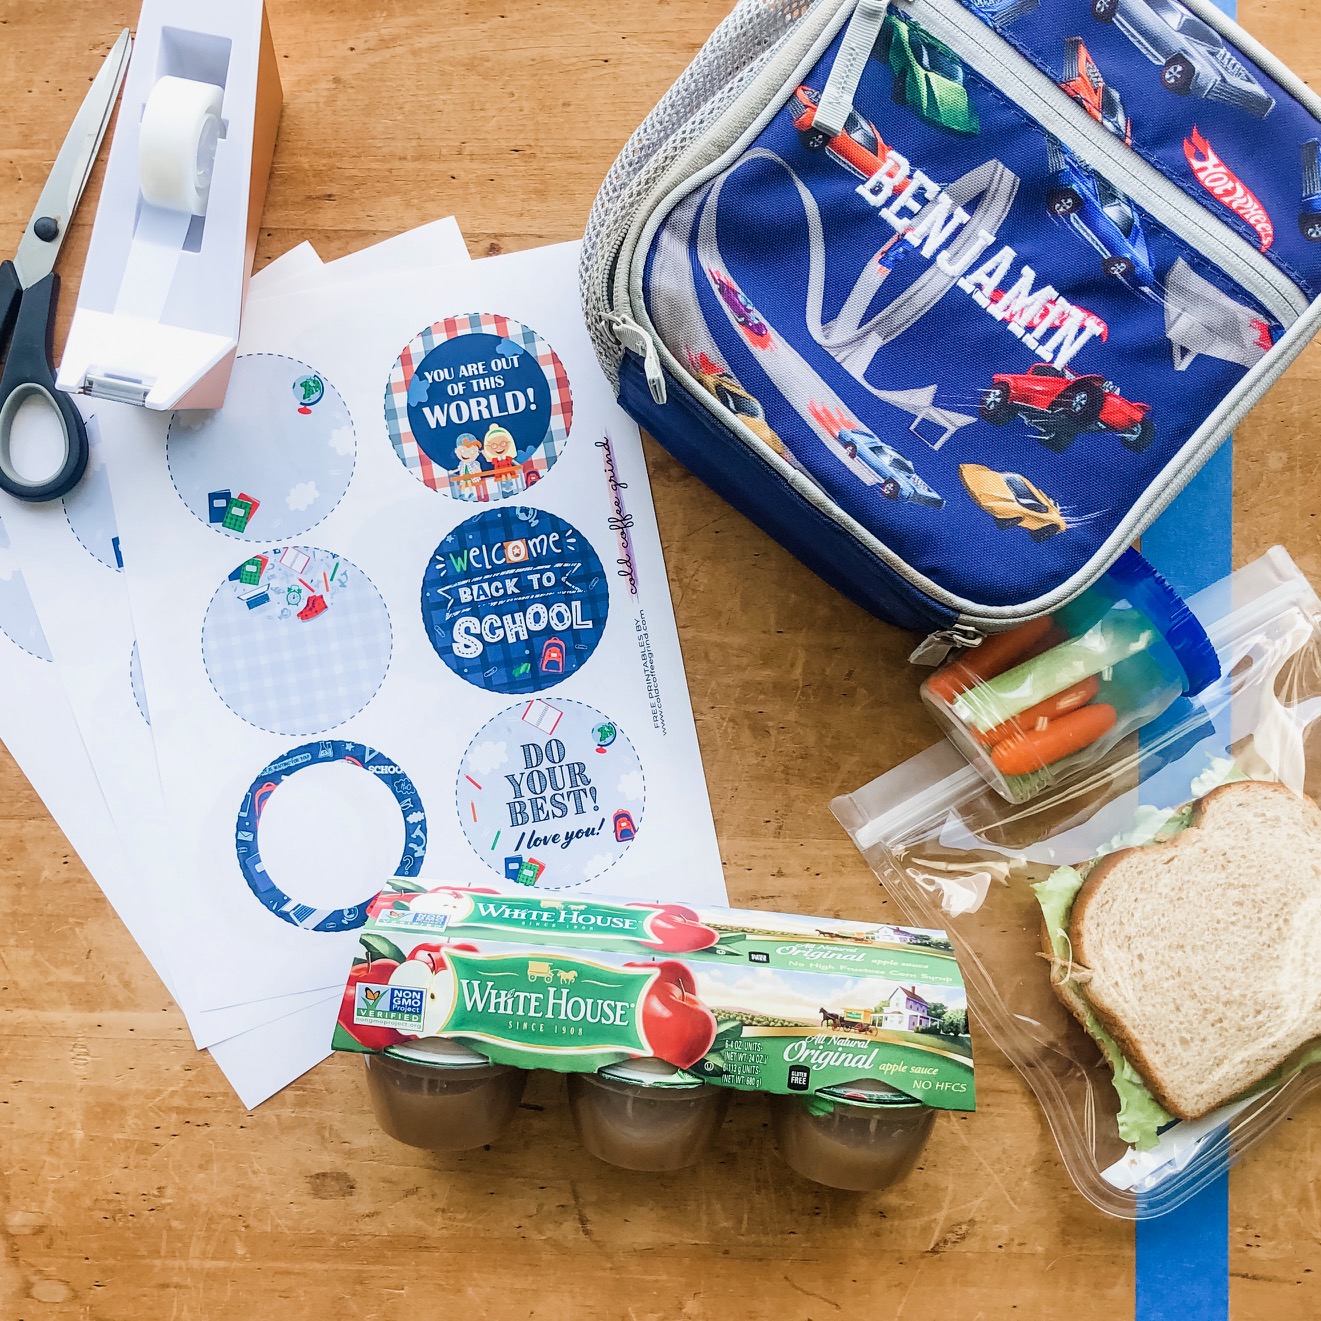
Back to School Printables!

IMG_0315


Well, it happened….we blinked, and Summer has come and gone. As much as I love Summer, there’s always something sweet about the start of Fall. School supplies, a new schedule, and cooler days are ahead of us and who can be sad about that?!

I don’t know about you, but I am excited to get back to packing lunches. For some reason, Summer is the season of 1,000 snacks. As soon as school is back in session (preschool in my case) we get back on a normal-ish meal schedule.

This year, I thought it would be fun to create little notes to add into Benjamin’s lunches. Notes of encouragement, sweet reminders, and kid friendly affirmations. While I love being crafty, I’m not a successful #pinterestmom. Therefore, I created these fun printables to add to his favorite White House Foods® Applesauce cups and CLEAR pouches! Super simple, yet make his lunch special.

Feel free to download, print, tape! There are blank ones too to personalize your note.

A little effort goes a long way with kids, and what better way to remind them how special they are and how much they are loved!

Download for FREE below.

Apple Sauce Cups Printable: HERE!

Apple Sauce Pouch Printable: HERE!

IMG_0314


Patriotic Picnic Printable

The first 4th of July printable was such a hit, I decided to do another! Who doesn’t love options?! If you missed the first one, you can find it here!

Use these printables to create a kid friendly, healthy snack for your celebrations! Adding a printable takes only a few minutes, yet makes you look like the Pinterest Queen! #winning

IMG_7516

What you need:

Just print, cut, & tape! Put it a cute basket & take to your 4th of July cookout.


As always, thanks for reading! Be sure to share pictures of your festive pouches on social media and tag @coldcoffeegrind!

xoxo,


Brittany

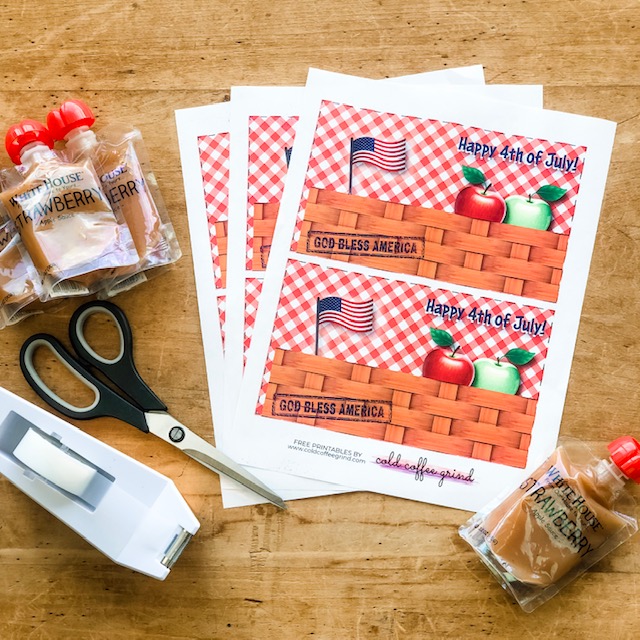
4th of July Applesauce Pouch Printable

Hey, all…so I LOVE the 4th of July! There’s just something so nice about celebrating our freedom, celebrating with friends and family, and obviously fireworks. I love creating some type of Pinterest-inspired dish for each holiday but, those festive dishes aren’t always kid friendly….or healthy! So, I decided to create a quick, simple printable for your 4th of July celebrations!

IMG_7279

What you need:

Just print, cut, & tape! Put it a cute basket & take to your 4th of July cookout.

IMG_7280


As always, thanks for reading! Be sure to share pictures of your festive pouches on social media and tag @coldcoffeegrind!

xoxo,


Brittany


Bright and Beautiful Easter Egg Dying with White Distilled Vinegar and Cool Whip

Want in on the secret to getting the brightest and most beautiful coloring on your Easter Eggs? Cool Whip + White House Foods White Distilled Vinegar!

I am obsessed with this technique. It’s simple, somewhat clean, and creates BEAUTIFUL eggs!

Ingredients:
Supplies:
  • Paper Towels
  • Tin/Foil Pan
  • Large Bowl
  • Small Cups
  • Spoons
Directions:
  1. Prepare eggs. Pour White House® White Distilled Vinegar into a bowl. Submerge the hard-boiled eggs into the vinegar. Let the eggs soak for 2 minutes. Removes the eggs and dry with paper towels.
  2. In small cups, mix a little bit of each color of gel coloring with a few drops of vinegar.
  3. Spread the cool whip into your tin pan.
  4. Drip food coloring-vinegar mixture over the whipped cream in small drops. Be sure to space the colors apart.
  5. With the end of a spoon, swirl the colors into the cool whip. Be sure not to completely mix the colors.
  6. Roll your eggs in the mixture. Use your spoons to push them through the colored cream. Make sure each egg does one complete rotation and is covered in colored cream. Do not over rotate your eggs through the mixture, too many colors mixed = brown. Brown isn’t very Eastery!
  7. Keep the eggs in the mixture for 30 minutes MAX!
  8. Wipe the cream off the eggs with a paper towel. If too messy, run under cold water.
  9. Voila! You have some beautiful eggs! (Pictures of the steps below!)

If you try this method, take pics and tag me on social @coldcoffeegrind or #coldcoffeegrind ! I would love to see!


xoxo,

Brittany

For more Easter activities:

Free Printable!

Easter Basket Ideas

Pouch Printable

And here!


Easter Bunny Trail Mix!

When it comes to food, PRESENTATION is everything. This simple trail mix recipe is literally the easiest thing I have ever thrown together, and yet I the crowd always goes wild. This is a “go to” treat at Easter Dinner and school parties! It’s delicious, looks adorable, yet requires little time and effort….always a win in my book!

This recipe is perfect for a large crowd or school party. If you want a smaller serving, cut the recipe in half! Have fun with it and change up the ratio for your preference of sweet vs. savory!

Easter Bunny Trail Mix

Mix all ingredients together and serve in an line with tissue paper! Remember, presentation is everything.  

If you have trouble finding these items in your store, just click the direct links for a little shopping help! And for those of you with a sweet tooth (like me) add in a little more of those Cadbury eggs and M&M’s. #noregrets

As always, thanks for reading and if you make this at home.. share and tag me @coldcoffeegrind! I would love to see.


xoxo,

Brittany


Looking for some other Easter activities…

Easter Egg Activities Printout: Click Here!

Easter Applesauce Pouch Wrap: Click Here!

Spring Cleaning: Click Here!